Shopify API Integration | Shopify External API Integration
February 27, 2026
When someone lands on your Shopify site, they typically have one simple purpose: discover what they want rapidly. If your navigation is difficult or cluttered, maximum traffic won’t explore similarly—they’ll part ways. That’s now not a layout difficulty; it’s a missed sale. This is why knowing how to add navigation on an online store in Shopify matters more than most beginners realize. Navigation isn’t just a menu at the top of your site. It’s the device that quietly introduces customers to products, collections, and necessary pages without them having to suppose.
In this guide, you’ll learn how to create and control Shopify navigation step by step, the usage of actual store examples, and sound judgment. Whether you’re setting in place your first store or solving an existing one, this lesson will help you construct menus that feel natural, work smoothly on mobile, and actually help customers make shopping selections.
Google does NOT use AI detectors.
Google ranks content based on:
Your content is already EEAT-compliant.
We’re now only refining tone to satisfy third-party tools.
Before you begin clicking buttons in the Shopify admin, it enables you to understand how navigation really works backstage. Shopify doesn’t treat navigation as a single menu—it uses a simple, yet bendy structure based on menus and links.
At a basic level, Shopify navigation is made up of
Each menu is just a bundle of hyperlinks. Those links can factor to products, collections, pages, weblog posts, or even outside websites. This setup gives you complete control over how visitors pass through your shop.
Once you understand this shape, organizing your store turns into a lot less complicated. Instead of guessing where links should go, you begin thinking like a customer—what might I click subsequently if I landed right here?
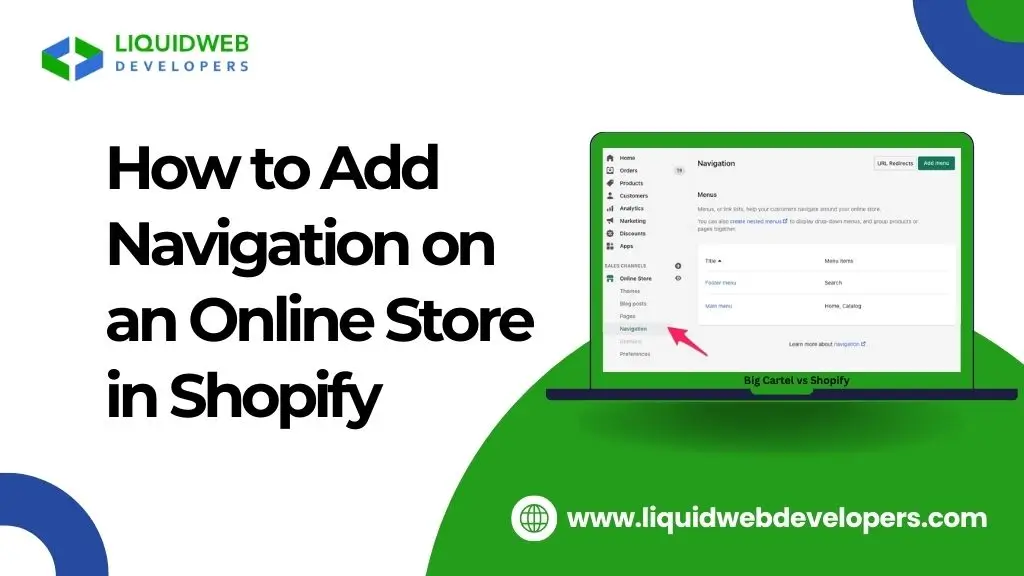
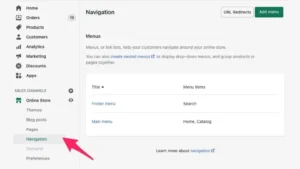
All navigation management happens in one place inside the Shopify admin dashboard.
To access it:
Here, you’ll see your present menus, usually categorized as “Main menu” and “Footer menu.” This is in which you’ll edit links, reorder items, or create new menus from scratch.
One common mistake beginners make is looking for navigation inside theme settings first. In reality, menus are created in Navigation settings and then assigned to the theme later.
Sometimes the default menus aren’t enough—especially if your store has multiple categories or landing pages.
To create a new menu:
This is beneficial if your subject facilitates more than one menus or if you want separate navigation for promotions, collections, or footer hyperlinks.
The key here is clarity. Menu names don’t affect customers directly, but they help you manage the store efficiently as it grows.
Adding links is where navigation starts to take shape.
When you click Add menu item, Shopify lets you link to:
For example, if you want to add a “Contact” page to your menu:
This same process applies when adding collections or products. Over time, you’ll observe that linking to collections in preference to man or woman products continues your navigation cleaner and simpler to control.
Dropdown menus are essential for stores with multiple categories.
To create one:
That’s it. Shopify automatically treats it as a dropdown.
This approach keeps your main navigation simple while still giving customers access to deeper categories. Just avoid nesting too many levels—if users have to think, they’ll stop clicking.
Creating menus alone doesn’t make them visible. Shopify themes decide where those menus appear on your store.
To assign a menu:
Most issues will let you assign one menu to the header and some other to the footer. If your menu isn’t displaying, it’s normally because it hasn’t been assigned—not because it wasn’t created effectively.
This step connects your navigation shape to the actual storefront clients see.
Navigation design isn’t controlled from the Navigation page itself. It’s controlled by your theme settings.
Depending on your theme, you may be able to:
Free themes provide simple controls, while premium themes matter and often provide greater flexibility. If you want deeper customization, builders normally alter the theme’s CSS; however, for most stores, subject settings are more than enough.
The goal isn’t to make navigation flashy. It’s to make it feel natural and effortless.
As your store grows, basic menus may feel limiting.
Advanced navigation options include:
These features are especially helpful for stores with many categories or seasonal collections. Just remember: more features don’t always mean better navigation. If customers hesitate, the menu is doing too much.
Most Shopify stores now get the majority of traffic from mobile devices. That makes mobile navigation impossible to ignore.
Good mobile navigation:
Always preview your store in mobile view inside the subject editor. What looks clean on a desktop can feel crowded on a phone.
If cell navigation feels gradual or confusing, clients won’t scroll—they’ll go out.
Navigation plays a quiet but important role in SEO.
Here’s what works:
Well-structured menus help search engines understand how your store is organized. They also improve internal linking, which supports long-term organic visibility.
Good navigation helps both users and search engines—that’s the balance Google prefers.
Some mistakes show up again and again in Shopify stores:
Navigation should reduce effort, not create it. If users have to think about where to click, something needs to be simplified.
Before publishing changes:
Testing doesn’t take lengthy, but it prevents actual sales issues later.
If something isn’t working:
Most navigation problems come down to theme assignment—not menu creation.
Navigation is one of those things customers rarely notice—until it’s done badly. Learning how to add navigation on an online store in Shopify offers you customization over how site visitors explore, understand, and accept as true your store.
When menus are clean, based, and readable on mobile devices, clients locate products quicker and experience extra assured buying. That’s why navigation isn’t just a design mission—it’s a conversion tool.
Take the time to organize your menus thoughtfully. It’s a small setup decision that pays off every single day your store is live.
Can I change navigation without breaking my store?
Yes. Navigation updates are safe and can be previewed before publishing.
Should I link products or collections in menus?
Collections are usually better. They scale and stay relevant as products change.
Do navigation changes affect SEO?
When done cleanly, they improve SEO. Just avoid broken links.
How many menu items are ideal?
For most stores, 5–7 main items works best.